In April 2020, I blogged about making sprue molds based on the Rybonator method. Today, I’m blogging about making cap molds via the Dice Witchery method. Why cap molds? Well, we’ve seen some really cool petri dice, dice with heavier inclusions (like chunky glitter), and dirty pours that we wanted to try out, but those types of dice are not easily done with sprue molds because you have to use a pipette to get resin into the mold. Here, you can literally just pour the resin from the cup into the mold.
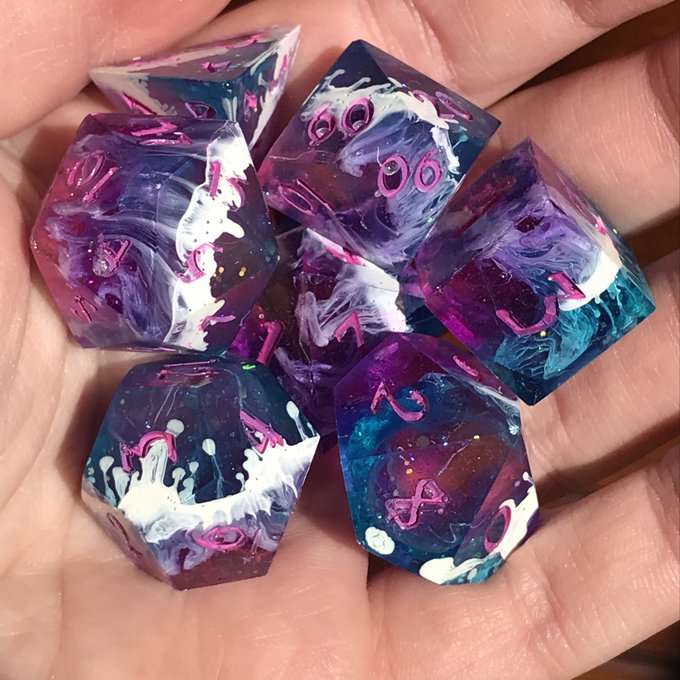
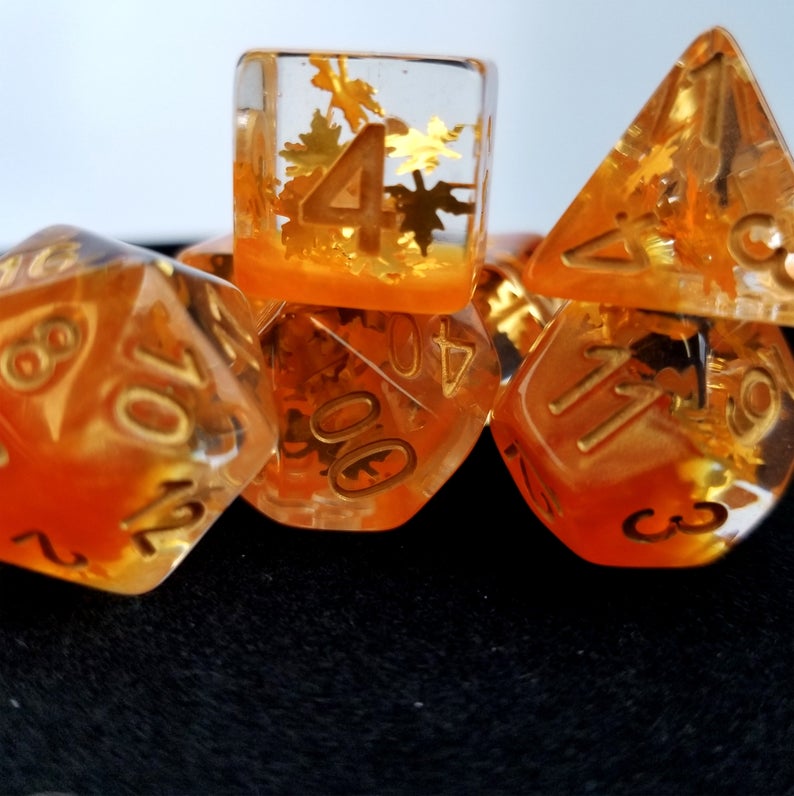
Here’s some examples of cool dice that are more easily made (we think, anyway) with cap molds, and which would be difficult to do with sprue molds:
Check out the video on which this post is based:
If you prefer to instead just scan through the pictures for a how-to, then keep reading!
Cap Mold Shopping list:
- Dice you want to use as “masters” (i.e. make molds from them so you can copy them)
- 1 1/4 inch PVC pipe coupling (if it has a horizontal ridge in the middle inside, that’s fine – just make sure your dice are small enough to fit underneath it and still have some room; otherwise you’ll need a smooth pipe b/c you have to stick the mold back in to make the caps and it’ll be hard to get past the ridge)
- Clear packaging tape (1 inch can work, though 3 inch is ideal for the base)
- Tweezers
- Rhinestones or some small object that has a flat and a rounded side; enough for 1 per dice/mold
- Hot glue gun and hot glue
- petroleum jelly, Vaseline, or the like to lubricate the molds (means the silicone won’t stick to the pipe)
- Q-tips or clean eyeshadow applicators (to apply the lubricant to the molds
- Silicone (we used Dragon Skin 20)
- Mixing cup (a clear solo cup works)
- An exact-o type of knife for mold clean up
Part 1: Making the Base of the Cap Molds
Get your dice masters and stick each dice onto separate, single strips of packing tape about 4 inches long. Then add your “gem”.
3-inch-wide tape is ideal, but regular size –whatever that is–was workable for us (we just had to double tape it). We decided to stick the lowest dice face against the tape because…well because my hubs made that decision.
Press firmly to make sure the tape adheres to the dice. The point of this is to make sure the poured silicone can’t cover that particular face, as that would make it really difficult to finish the cap part of the mold. If that happens to you, I assume you just have to cut off that extra silicone over the bottom face of the mold with a knife and hope for the best.

Once you add the dice, add your rhinestone or whatever do-hickey you’re using about an inch away from the dice on the tape, flat side to the sticky side. This is the “key” or lid matching mechanism that will help lock your lid in place later. It’s not the only “key” hole you’ll make, but it’s the first.
Next, apply the jelly lubricant you’ve got to the inside of the pipe — we only did it to the ridge inside, since that’s all the further we planned to pour silicone.
I found out that using an eyeshadow applicator would be better than Q-tips because Q-tips sometimes leave fibers inside. Not the end of the world, but you’re trying to avoid foreign particulates for your mold.


Apply the pipe to the tape centered over the dice and gemstone. Note, our pipes had a smooth end and an end with raised lettering–use the smooth side for this.


Note that the raised writing is on the camera’s side, so it’s not against the tape. From the top, you can also see the gem stone next to the dice master.
Do this for all your dice.
If you didn’t have 3 inch packing tape, you’ll need to double up / criss-cross another strip of tape under the one you have at a perpendicular angle so that you have a complete seal of tape over the pipe opening. It’s hard to see here, but the tape is like a cross under the pipe.

Using a hot glue gun, glue a seal around the base of the pipe and tape. PRO TIP: Make the hot glue a wide brim, to make peeling it off later easier. If you’re making small lines, you’ll be nitpicking with your nails later.


Now fold the excess tape sticking out from the pipe onto itself, so it doesn’t stick to anything, thereby reducing the chances it’ll get torn off. It doesn’t have to be perfect.

Here’s the top and bottom view of the mold after that step (after-ish…one is after, one was before, but you get the idea :D)


Mix the silicone and pour. We have recently favored pouring silicone by weight (on a kitchen scale), rather than trying to measure it out by eye in the cup. Our initial pour was 14 oz (7 oz each of parts A and B), and that got 6 molds out of our 8 filled to the interior ridge. That’s about 2.33 oz per mold, which makes it about 1.17 oz per A and per B. We did a second pour and filled the remaining 2 based on that math.

By the way, there’s no “right” way to do any of this. 14 oz is a lot of silicone to work with, and a tongue depressor isn’t long enough, so we use a plastic cooking spoon handle. Silicone comes right off it.

We mixed for 4-5 minutes. After working with Sorta Clear 37 (THICCC), this was easier to mix and pour. The paperwork says Dragon Skin 20 has a pot life of 25 minutes and a cure time of 4 hours. We didn’t bother using the vacuum chamber (we haven’t for a while now).
Pour into the molds. We didn’t need to pour up to the interior ridge because our dice fit well beneath it, but we figured that since we had the extra silicone mixed, we may as well, since that would nearly guarantee the molds would all be the same size, and that would help for stacking in the pressure pot, if necessary.

Do note that while it looks like it’ll be clear once it cures, it’s not. PRO TIP: If you’re going to make more sets of molds, add some food dye drops to the silicone before mixing each batch. TRUST ME, it’ll make lid-matching way easier down the road. Also note: permanent marker has 0 effect on these suckers. We use labels from a labelmaker, but they fall off a lot, so…watch yourself. Luckily, the “keys” help, but just have some way to identify the molds when their lids are off.

Pop these suckers into the pressure pot! We set ours for 35 PSI, and we had a small leak but the pressure pot held steady at 22 PSI, so it was fine. 4 hour cure time. We usually leave it in overnight.

Part 2: Making the Caps
Take off the tape, remove ALL the hot glue from the pipe, and use your thumbs to press the bottom of the mold out (don’t touch the exposed face of the dice if you can avoid it). Ideally put pressure around the outside of the mold and work your way in. This is why the lubricant is super important to get all the spots, to make this process easier.
Cut out two triangular wedges from each mold. This will be the second part of your “key” for the lid to make it easy to match up when you close up your mold. UPDATE 2022: We later made our “keys” into square wedges that are slightly angled so that they lock the lid on more tightly. I’ll get a picture soon.

Re-lubricate the inside of your pipes and the “key” cutouts (we’ll will do more lubricant on the face of the mold in a few steps below).

Put the molds back in. If you followed what we did, the molds will stop at the ridge and still be flush with the top.
Apply lubricant on the top part of the mold, BUT NOT ON THE FACE OF THE DICE!! The point is to have the silicone want to adhere to the face of the dice, but be easy to remove from the rest of the other silicone. If you skip this step, you’ve just created a really tall mold with no cap.
Remember– be sure to get lubricant into the cut-out sections.

Place packing tape along the top half of the exterior side of the pipe. Make sure it’s as flush against the pipe as you can get it.

Pour more silicone into the top half. We ended up mixing the remaining amount of the silicone in our bottles, and that was enough for the lids, so I didn’t measure it..

Stick those babies in the pressure pot for another 4 hours at 20-30 PSI.
We pulled them out right at the 4 hour mark, maybe a little sooner, and we realized that the molds weren’t quite hard enough to remove the tape. It was late, so we let them sit over night. We were able to remove the tape from the molds easily the next morning. The lids also came off without a hitch, though if you have some parts that are sticking, use an exacto-knife to clear them apart. Don’t forget to pop out the dice, too.
Here is what the top cap of the mold looks like. You can see the “key” parts that would fit into the divets carved into the base of the molds.

Here’s what they look like put together.

Pour some resin into the molds and test them out! The Dice Witchery video suggests dabbing some resin onto the number/face on the lid before placing the lid on the dice to reduce the chances of voids on the number. Be generous with the amount of resin you add on top, as (1) it’ll create a solid layer of flashing that will be much easier to remove, and (2) it’ll help with the shrinkage that occurs during the curing process. When you do sprue molds, you have a small reservoir, but with cap molds you just do the best you can by overfilling.
DON’T press the lids on TOO TIGHT, but DO make sure that they are solidly locked on.

Remember to do the lids too, to reduce the chance of top voids.

After the resin cures, gently remove the lid and then remove excess dried resin/flashing, being careful where it attaches near the dice face. If you’re worried, pop the dice out and then use an exact-o knife to remove the flashing.
We’ve found it best to first GENTLY push the sides of the mold away from the dice using fingers on opposite sides of the dice, like you’re trying to widen the gap. This often will break the flashing away from the dice, and will reduce possible tearing and sanding requirements later. You just don’t want to rip the flashing off harshly, as that could take off more resin than you intend and ruin the dice. If you can’t get it off, push the dice out with the flashing and deal with it outside of the mold with scissors and razor blades.


To be totally honest, only 1 mold was this easy to remove the excess resin (it was probably the 1 mold that had resin seeping out after lidding, but I’m not 100% sure on that). The rest required some scraping and we’ll need to clean them with rubbing alcohol later. UPDATE 2022: This is why you over-fill the mold on top, to make sure it has that extra amount to create flashing and to pull from when the resin shrinks during curing.
We found that popping the dice out is easier with 2 sets of hands, but it’s technically doable with 1.
Here’s what our first set of cap mold dice looked like — other than a little flashing snips, I think I merely need to sand them on my highest zona paper (white) and ink! The second was a mermaid attempt, and then blood drops (like vampires).


Actually, the blood dice–however cool looking–had too much alcohol ink in them, and I think only the percentile or the d10 survived–the rest remained too squishy and we had to toss them. We will make them again someday!
In November 2020, we took a break from dice making, having started in January of that year (we got a 3d printer and PRINTED ALL THE MINIS WE COULD OMG IT WAS GLORIOUS). In June 2022, we decided to get back into dice making after another trip to D&D in a Castle in March 2022 (post coming once I finish the novelization of our campaign, in Fall 2022).
We got the rust off by starting with a rainbow set (yay PRIDE MONTH) made from some clear resin, some resin colored with mica powder, and some white alcohol ink to get some swirls (we used a toothpick to help the swirling along).
There were a lot of voids and some stickiness in just about all the sets, but we took that as an opportunity to try out UV resin for patching. It works great, if you have clear resin in your dice, but nothing can repair numbers lost in a void. I’d say at least 3/4 of the dice were salvageable, and we learned from it and are working on more dice. We also have an upgraded pottery wheel for sanding (new post coming soon re: our finishing process).

They may look plain at a distance, but trust me, they’re swirly AF.

lauren-hanley-brady-la-mesa-attorney, lauren-brady-sellers, lauren-sellers, hanley-brady, lauren-hanley-brady-san-diego-attorney